

Key Takeaways
Choose the right seeds for your climate and growing conditions.
Use a high-quality seed starting mix and appropriate containers.
Provide adequate light and maintain the right temperature for germination.
Water your seeds properly to avoid overwatering or underwatering.
Monitor and care for your seedlings to ensure healthy growth.
Jumpstart Your Garden: The Basics of Seed Starting
Starting your garden from seeds can be a rewarding experience, giving you a head start on the growing season and a wider variety of plant options. But it’s not just about throwing seeds into soil and hoping for the best. There’s an art to seed starting, and with a few essential tips, you’ll be on your way to a lush, vibrant garden.
Selecting the Right Seeds
Before you dive into the soil, let’s talk about seeds. Not all seeds are created equal, and the ones you choose will play a significant role in your gardening success. Consider these factors:
Climate: Select seeds that are well-suited for your local climate and the current season.
Space: Make sure you have enough room for the plants once they reach maturity.
Grow Time: Check the seed packet for plant maturity times to ensure they’ll thrive in your growing season.
Remember, some plants are better started indoors, while others prefer direct sowing. Know which is which to maximize your success.
Gather Your Supplies
Now, let’s gear up. You’ll need some key supplies to start your seeds off right:
Seed Starting Mix: Choose a mix that’s fine-textured and specifically designed for seed germination.
Containers: Anything from specially designed seed trays to recycled household items can work, as long as they’re clean and have drainage holes.
Labels: Trust me, you’ll want to keep track of what you’ve planted where.
Once you’ve gathered your supplies, you’re ready to get your hands dirty!
Top Seed Starting Techniques for First-Time Gardeners
First-time gardeners, listen up! Starting seeds doesn’t have to be intimidating. Follow these steps, and you’ll be on your way to a green thumb in no time.
Prepping Your Seed Starting Mix
The foundation of successful seed starting is the mix. Here’s how to prepare it:
Moisten the mix with warm water until it’s damp but not soggy.
Fill your containers, leaving a little space at the top.
Gently firm the mix to eliminate air pockets.
Now, your mix is ready to welcome those eager little seeds.
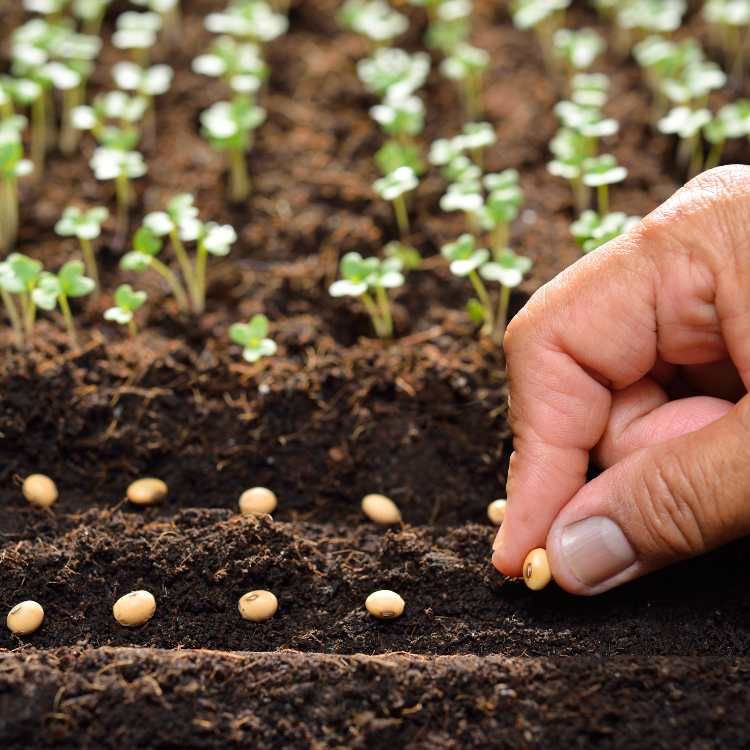
Sowing Seeds Step-by-Step
With your mix prepped, it’s time to sow your seeds. Follow these simple steps:
Read the seed packet for specific planting instructions.
Place seeds at the recommended depth and cover lightly with mix.
Water gently to settle the seeds.
Cover the containers with plastic or a dome to retain moisture.
Place in a warm area to encourage germination.
Keep an eye on your seeds, and once they sprout, move them to a well-lit area.
The Right Environment for Seed Germination
Seeds are like Goldilocks; they need everything just right to sprout. That means the right amount of light, the perfect temperature, and the correct amount of water. Here’s how to create that perfect environment.
Lighting: Natural vs Artificial
Light is crucial for your seedlings. They need it to grow strong and healthy. If you’re using natural light, place your seedlings near a sunny window. Otherwise, artificial grow lights will do the trick. Just make sure to:
Keep lights on for 14-16 hours a day.
Adjust the height as your seedlings grow to avoid scorching.
Remember, without enough light, your seedlings might become leggy and weak.
Temperature Control: Keeping It Cozy
Most seeds germinate best in warm temperatures, around 65-75°F (18-24°C). You can achieve this with a heat mat or by placing your seed trays in a warm spot. Once seeds have sprouted, they can handle slightly cooler temperatures.
Keep track of the temperature with a thermometer to ensure your seedlings are cozy and content.
Water Wisely: Balancing Moisture for Success
Water is life, but too much or too little can spell disaster for your seeds. Here’s how to water wisely:
Signs of Overwatering
Overwatering can drown your seeds or cause fungal diseases. Watch for these signs:
Soggy soil
Mold or algae on the surface
Seedlings wilting or collapsing
If you see these signs, cut back on the water and improve airflow around your plants.
Signs of Underwatering
Underwatering is just as harmful. Keep an eye out for signs of stress in your plants, which can be a result of not receiving enough water. To avoid common issues associated with seed starting, consider reading about the top 10 mistakes in seed starting.
Dry, crumbly soil
Slow growth
Wilting
Maintain consistent moisture, but be careful not to overdo it.
Stay tuned for more detailed guidance on nurturing your seedlings, troubleshooting common problems, and ensuring a successful transition to your garden.
Grow Strong: Caring for Your Seedlings
Once your seeds have sprouted, it’s time to focus on the next phase: nurturing those tiny seedlings into robust plants. Consistent care is key. You’ll want to ensure they have enough light, water, and nutrients, and also that they aren’t crowded by their neighbors.
Thinning: Making Room for Growth
Thinning might seem counterintuitive – why remove plants you’ve worked so hard to grow? But it’s crucial. Thinning ensures that the remaining plants have enough space to develop properly. Here’s how to do it:
Wait until seedlings have at least one set of true leaves.
Choose the strongest seedlings to keep and gently pluck out the rest.
Be careful not to disturb the roots of the seedlings you’re keeping.
Thinning might tug at your heartstrings, but remember, it’s for the greater good of your garden.
After thinning, continue to monitor your seedlings closely. They’re still in a delicate stage and need your attention to thrive. Watch for signs of stress, like discoloration or stunted growth, which could indicate a problem with light, water, or nutrients.
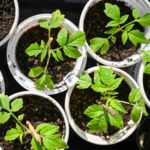
Transitioning to Bigger Containers

As your seedlings grow, they may start to outgrow their initial containers. That’s a good sign – it means they’re ready for the next step. Transplanting them into larger pots gives their roots room to expand and supports their continued growth. Here’s how to transplant safely:
Fill the new container with moistened potting mix.
Make a small hole in the center for the seedling.
Gently remove the seedling from its original container, being careful not to damage the roots.
Place the seedling in the new container and gently firm the soil around it.
Water the seedling well to help it settle into its new home.
With more space to grow, your seedlings will soon be ready for their final destination: your garden.
Common Seed Starting Pitfalls and How to Dodge Them
Even with the best intentions, things can go awry in the world of seed starting. But don’t worry, I’ve got your back. Let’s look at some common pitfalls and how to sidestep them.
For example, many gardeners face the issue of ‘damping off’ – a fungal disease that can quickly wipe out your seedlings. Prevention is key. Use clean containers, avoid overwatering, and provide good airflow around your seedlings.
Another common issue is leggy seedlings, which often result from insufficient light. Make sure your seedlings are getting plenty of light – if you’re using artificial lights, they should be just a couple of inches above the plants and on for 14-16 hours a day.
Avoiding Damping Off
Damping off is a fungal disease that can cause your seedlings to rot at the soil line and collapse. It’s heartbreaking, but avoidable. Here’s how to prevent damping off:
Use a sterile seed starting mix and clean containers.
Don’t overwater – let the soil surface dry out slightly between waterings.
Provide good airflow around your seedlings by spacing them properly and using a fan if necessary.
By taking these precautions, you can keep damping off at bay and ensure your seedlings grow up healthy and strong.
Dealing with Leggy Seedlings
Leggy seedlings are tall and thin, with weak stems. They’re stretching for light, which they’re not getting enough of. To correct this:
Move your seedlings closer to the light source.
If you’re using window light, rotate your plants regularly to ensure even growth.
Consider supplemental lighting if natural light is insufficient.
With proper light, your seedlings will grow stout and strong, ready for the challenges ahead.
Hardening Off: Preparing for the Outdoors
After your seedlings have grown in their snug indoor conditions, they’ll need to toughen up before moving out to the garden full-time. This process is known as ‘hardening off,’ and it’s crucial for helping your plants adapt to the harsher outdoor environment. Without this step, your tender seedlings might suffer from shock and could be damaged by sun, wind, or temperature changes.
To harden off your seedlings, start by placing them outside in a sheltered spot for a few hours each day, gradually increasing their exposure to the elements over the course of a week or two. Be sure to bring them in if there’s a risk of frost or if the weather turns particularly nasty. By the end of the hardening-off period, your plants should be ready for the great outdoors.
Begin with 2-3 hours of outdoor time in a shaded area.
Gradually increase exposure to sun and wind.
Reduce watering slightly to help them adjust to less frequent rains.
After 7-10 days, your plants should be ready to stay out overnight.
Remember, patience is key. Rushing this process can undo all your hard work, so give your plants the time they need to acclimate properly.
Planting Out: The Final Step
Once your seedlings are hardened off, it’s time for the final step: planting them out in your garden. Choose a cloudy day or late afternoon to minimize stress from the sun. Dig a hole for each plant, gently remove the seedling from its container, and place it in the hole at the same depth it was growing before. Fill in around the roots with soil, water thoroughly, and, if necessary, provide some shade for the first few days to help them settle in.
With your plants in the ground, keep a close eye on them over the next few weeks. They may need a little extra water and care as they establish themselves in their new home, but soon they’ll be growing vigorously and on their way to producing a bountiful harvest.
Frequently Asked Questions (FAQ)
Got questions? You’re not alone. Here are some of the most common queries from budding gardeners:
What are the best conditions for seed germination?
Most seeds germinate best in warm, moist soil. Aim for a temperature between 65-75°F (18-24°C) and keep the soil consistently moist but not waterlogged. Adequate light is also important once the seeds have sprouted.
Each plant has its own preferences, so always check the seed packet for specific instructions. And remember, a little patience goes a long way – some seeds take longer to germinate than others.
How do you know when seedlings are ready to be transplanted?
Seedlings are ready to transplant when they have at least a couple of sets of true leaves – these are the leaves that come after the initial, simpler seed leaves. You should also look for signs that the plant is outgrowing its current container, such as roots coming out of the drainage holes.
Can you reuse seed starting mix?
You can reuse seed starting mix, but it’s important to sterilize it first to kill any pathogens that could harm your new seedlings. Spread the mix on a baking sheet and bake in an oven at 200°F (93°C) for 30 minutes. Allow it to cool before using.
However, for the best results and to minimize the risk of disease, using fresh, sterile seed starting mix each season is recommended.
What should I do if my seedlings aren’t growing?
If your seedlings have stopped growing, they might be lacking in light, nutrients, or water. Ensure they’re getting enough light – if they’re indoors, they may need more hours under grow lights. Check the moisture level of the soil; it should be moist but not soggy. Finally, consider feeding them with a diluted liquid fertilizer to provide a nutrient boost.
How can I prevent mold growth in my seed starting trays?
Mold can be a common issue in the warm, humid environment of seed starting trays. Here’s how to prevent it:
Ensure good airflow by not overcrowding your seedlings and using a fan if necessary.
Water from below to keep the soil surface drier and less hospitable to mold.
Remove any dead plant material promptly, as it can be a breeding ground for mold.
By following these steps, you can keep mold at bay and help your seedlings thrive.
Remember, starting seeds is just the beginning of your gardening adventure. With the right care and attention, you’ll be able to watch your plants grow from tiny seeds into flourishing vegetables, flowers, or herbs. So roll up your sleeves, get your hands in the dirt, and let’s get growing!


Leave a Reply