
Imagine transforming your urban space into a lush, green oasis, where the simple act of sowing seeds can yield a harvest of beauty and tranquility. With low-maintenance indoor seed collections, you can cultivate your own urban Eden, regardless of your gardening experience or available space. Let’s embark on this journey together, nurturing nature within the comfort of our homes.
Before we delve into the world of indoor seed collections, let’s quickly highlight the core insights you’ll gain from this article:
Article-At-A-Glance: Cultivating Convenience
- Discover the best low-maintenance seeds for urban indoor gardens.
- Learn how to assess your indoor environment for optimal plant growth.
- Master the seed starting process with easy-to-follow steps.
- Find out how to care for your plants with minimal effort.
- Uncover the joys of harvesting and enjoying your indoor garden bounty.
Urban living often means limited space and a fast-paced lifestyle, but it doesn’t mean you have to forgo the pleasures of gardening. In fact, indoor gardening is on the rise, offering city dwellers a way to connect with nature, grow their own food, and enhance their living spaces with greenery.
The Rise of Indoor Horticulture in Urban Spaces
As more people flock to cities, the concrete jungle can feel stifling. That’s where indoor gardening comes in as a breath of fresh air. It’s not just about aesthetics; it’s about creating a healthier, happier living environment. Indoor plants can improve air quality, reduce stress, and even boost productivity. With the right seed collections, you can grow a variety of plants, from herbs to leafy greens, without needing a green thumb or a backyard.
Nurturing Nature Indoors: Selecting the Right Seeds
Choosing the right seeds is crucial for a thriving indoor garden. Low-maintenance seeds are ideal for urban gardeners who want to enjoy greenery without the fuss. These seeds are selected for their resilience, minimal care requirements, and suitability for indoor conditions.
Assessing Your Urban Environment
Before you pick your seeds, take a moment to observe your living space. How much natural light does it receive? What’s the average temperature and humidity? Understanding your environment will guide you in selecting seeds that will flourish in your specific conditions.
Top Low-Maintenance Indoor Seed Varieties
Now, let’s talk about some of the best seeds to start your indoor garden:
Herbs: Flavorful and Functional
Herbs are a fantastic choice for indoor gardens. They require little space, grow quickly, and can be used to add fresh flavor to your meals. Consider starting with basil, chives, or mint, which are particularly forgiving for beginners.
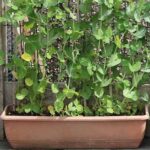
Leafy Greens: A Staple for Small Spaces
Leafy greens like spinach and lettuce are perfect for indoor cultivation. They thrive in cooler temperatures, which makes them suitable for most indoor environments, and they don’t need much room to grow.
Edible Flowers: Beauty and Taste Combined
Edible flowers such as nasturtiums and violas add a splash of color to your indoor garden and your plate. They’re not only beautiful but also easy to grow and maintain.
Pro Tip: When selecting seeds, look for varieties labeled as “dwarf” or “compact” as these are bred to thrive in small spaces and are perfect for indoor gardens.
Now that you’ve got a sense of the types of seeds that will work well in your urban indoor garden, let’s move on to the exciting part – getting those seeds started!
Germinating Success: The Seed Starting Process
Starting seeds indoors is a simple and rewarding process. With a few basic supplies and some patience, you’ll be on your way to growing a lush indoor garden. Here’s how to get started:
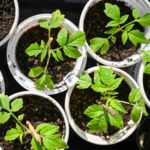
Supplies and Setup: Preparing Your Indoor Garden
First, gather your supplies. You’ll need seed trays or small pots, seed starting mix, and a light source if natural light is limited. Make sure your containers have drainage holes to prevent waterlogging.
- Seed trays or small pots with drainage holes
- High-quality seed starting mix
- Light source (grow lights or a sunny windowsill)
- Watering can or spray bottle
- Labels to keep track of your plants
Once you have your supplies, fill your containers with the seed starting mix, moisten the soil, and plant your seeds according to the packet instructions. Label each container with the plant’s name and the sowing date.
Seed Sowing Techniques for the Urban Grower
Sowing seeds is more art than science. Sprinkle them evenly over the soil surface, then cover them lightly with more soil or vermiculite. Some seeds need light to germinate, so be sure to check the seed packet for specific instructions.
Pre-germination Practices
For seeds with a longer germination time, consider pre-germinating them by placing them between damp paper towels in a plastic bag. This can speed up the process and increase your success rate.
Optimal Soil Composition
The right soil mix is essential for seedling development. A good seed starting mix should be fine-textured and free-draining to encourage strong root growth. Avoid using garden soil, as it can be too heavy and may contain pathogens harmful to seedlings.
Remember, patience is key. Some seeds sprout within days, while others may take a few weeks. Keep the soil consistently moist but not waterlogged, and provide plenty of light once the seedlings emerge.
There you have it, the first steps towards creating your own indoor garden haven. Stay tuned for more detailed guidance on caring for your plants, ensuring they grow strong and healthy, and ultimately, enjoying the fruits of your labor.
Leafy Greens: A Staple for Small Spaces
Leafy greens are the unsung heroes of the indoor garden. Varieties like kale, arugula, and swiss chard can be harvested leaf by leaf, providing a continuous bounty from a single plant. They’re not just space-savers; they’re also nutrient powerhouses. Plus, their quick growth cycle means you’ll see results fast, which is always encouraging for budding gardeners.
Edible Flowers: Beauty and Taste Combined
Edible flowers are the showstoppers of any indoor garden. With vibrant colors and unique flavors, they’re sure to impress both your eyes and your taste buds. Calendula and borage, for instance, are not only edible but also known to attract beneficial insects if you decide to move your plants outside. They’re easy to grow and can be used to garnish salads, desserts, or drinks.
Germinating Success: The Seed Starting Process
Germination is the magical phase when seeds awaken and sprout into life. This critical stage sets the foundation for your plant’s growth, so it’s important to get it right. Fear not, though; I’ll guide you through each step to ensure your seeds have the best start possible.
Supplies and Setup: Preparing Your Indoor Garden
Gearing up is the first step to any successful indoor garden. You don’t need much, but quality matters. Start with clean containers to prevent diseases, a sterile seed starting mix to provide the perfect growing medium, and if you’re short on sunshine, invest in some grow lights. These tools are your seeds’ best friends on their journey from dormancy to vitality.
Seed Sowing Techniques for the Urban Grower
Sowing seeds is like tucking them into bed. You want to ensure they’re comfortable, with just the right amount of cover. Some seeds prefer to be nestled under a thin layer of soil, while others want to be left on the surface to bask in the light. Always refer to the seed packet for the nitty-gritty on planting depth and spacing.
Pre-germination Practices
Give your seeds a head start with pre-germination. This simple trick involves germinating seeds before they’re planted. Place them between moist paper towels and check daily for sprouts. Once they show their tiny roots, gently plant them in your seed starting mix. This method can save you time and increase the odds of germination, especially for seeds that are slow to wake up.
Optimal Soil Composition
Think of your seed starting mix as the first food for your baby plants. It should be light and fluffy, allowing roots to breathe and grow without struggle. A mix of peat moss, vermiculite, and perlite is often a winning combination. Steer clear of heavy garden soil, which can compact and suffocate delicate seedlings. Remember, happy roots make for happy shoots.
With these tips, you’re well on your way to becoming an indoor gardening pro. Keep the soil moist, provide warmth, and wait for the magic to happen. Soon, you’ll witness the emergence of tiny green shoots reaching for the sky, a true testament to the wonders of nature and your nurturing touch.
Flourishing Flora: Cultivation and Care
Once your seeds have sprouted, the real fun begins. It’s time to ensure your little green friends have everything they need to grow up strong and healthy. Proper care involves a delicate balance of light, water, and attention. But don’t worry, I’ll walk you through the essentials to make sure your indoor garden thrives with minimal effort on your part.
Lighting: The Lifeline of Indoor Gardening
Light is to plants what food is to us – absolutely essential. Without adequate light, your plants will struggle to photosynthesize and grow. But how much light is enough, and what if your home doesn’t get a lot of natural sunlight? Let’s shed some light on the subject.
Determining Light Requirements for Indoor Plants
Each plant species has its own light preferences, but most indoor varieties have been selected for their adaptability to lower light conditions. Check the seed packet or plant tag for specific requirements. Generally, leafy greens and herbs can manage with moderate light, while fruiting plants like tomatoes need more intensity. A simple rule of thumb is to provide at least 6 to 8 hours of light per day for your indoor garden.
DIY Solutions for Adequate Lighting
If your home doesn’t resemble a sun-soaked greenhouse, don’t fret. Grow lights are a game-changer for indoor gardens. They’re available in various types, from fluorescent to LED, and can be as simple as a bulb in a desk lamp. You can even get creative and build a shelf with integrated lights for a sleek, space-saving solution. Just remember to place the lights close enough to the plants without causing heat damage, and set them on a timer to mimic the natural day-night cycle.
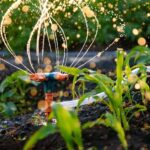
Watering Wisdom: Hydration without Hassle
Water is life, and your plants will remind you of this with their drooping leaves if they’re thirsty. But too much water can be just as detrimental as too little. The key is to find that sweet spot where your plants are happily hydrated without being waterlogged.
Self-watering Systems for Busy Urbanites
For those of us with hectic schedules, self-watering systems are a blessing. These systems use reservoirs to allow plants to drink at their own pace, reducing the risk of over or under-watering. You can purchase self-watering pots or get crafty and make your own using containers and some simple materials. This way, you can enjoy your weekend getaway without worrying about coming home to wilted plants.
Recognizing Signs of Over and Under-Watering
Plants have their ways of telling us what they need, and it’s crucial to recognize these signs. Over-watered plants often have yellowing leaves and a general look of being too soggy. Under-watered plants, on the other hand, will have dry, crispy leaves and may droop dramatically. Feel the soil; if it’s soggy, hold off on watering, but if it’s dry an inch below the surface, it’s time for a drink. A consistent watering schedule and checking the soil moisture before watering will help you avoid these common pitfalls.
With these guidelines, you’re well-equipped to provide your indoor garden with the care it needs. Remember, plants are resilient and will often bounce back from mistakes, so don’t be too hard on yourself if you encounter a few hiccups along the way. The important thing is to enjoy the process and the peaceful presence of your growing green companions.
The Harvest of Home: Enjoying the Indoor Gardening Bounty
The moment we’ve all been waiting for – harvest time! There’s nothing quite like the satisfaction of snipping fresh greens for a salad or plucking herbs for tonight’s dinner, all from your very own indoor garden. It’s the final reward for your patience and care, and trust me, it tastes all the sweeter for it.
Harvesting Techniques: From Seedlings to Salads
Harvesting is about timing and technique. For herbs, snip off what you need, taking care not to remove more than a third of the plant at a time – this encourages more growth. With leafy greens, you can either pick outer leaves as needed or harvest the whole plant if it’s reached full size. The key is to be gentle to avoid damaging the plant, ensuring it continues to produce for you.
Storing and Preserving Your Indoor Garden Harvests
Now, let’s make sure none of your precious harvest goes to waste. If you’ve grown more than you can eat fresh, there are simple ways to store and preserve your bounty. Herbs can be dried or frozen, and leafy greens can be kept in the refrigerator or frozen for future use. With these methods, you can enjoy the flavors of your garden long after the growing season has passed.
Drying Herbs for Year-Round Flavor
Drying herbs is like bottling sunshine. Tie small bunches of herbs and hang them upside down in a warm, airy spot away from direct sunlight. Once they’re dry, crumble the leaves and store them in airtight containers. They’ll keep for months, and every time you use them, you’ll be reminded of your garden’s summer days.
Freezing Greens for Easy Meal Additions
Freezing greens is a snap – literally. Blanch them by plunging into boiling water for a few seconds, then into ice water to stop the cooking process. Dry them off, then freeze them flat on a baking sheet before transferring to freezer bags. This way, you can grab a handful whenever you need a quick veggie boost in your meals.
Frequently Asked Questions
As you embark on your indoor gardening adventure, questions are bound to arise. Here are some answers to common queries that might pop up along the way.
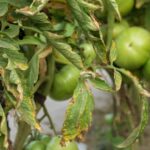
How Do I Manage Pests in an Indoor Garden?
Pests can be a nuisance, but they’re not unbeatable. The best defense is a good offense – keep your garden clean and your plants healthy, as pests often attack weakened plants. If you do spot unwanted visitors, isolate the affected plant to prevent spread. Use natural remedies like neem oil or insecticidal soap, which are effective and won’t harm your indoor environment.
With these tips and techniques, you’re well on your way to becoming a seasoned indoor gardener. Remember, the journey is as rewarding as the destination, and every seed you plant is a step towards a greener, more sustainable lifestyle. So, roll up your sleeves and let’s get growing!
Can Indoor Plants Improve Air Quality?
Absolutely! It’s not just an old wives’ tale; science backs it up. Plants are natural air purifiers, absorbing pollutants like benzene and formaldehyde through their leaves and roots. They also release oxygen, which freshens up the air we breathe. While a single plant won’t transform your home into a wilderness, a collection of indoor plants can contribute to cleaner air and a healthier living environment.
What Is the Best Way to Increase Humidity for Indoor Plants?
Many indoor plants come from humid environments and can struggle in the dry air of our homes, especially during winter when heating systems are running. To keep them happy, you can mist their leaves regularly, place a tray of water near them to evaporate, or use a humidifier. Grouping plants together can also help create a microclimate with higher humidity. Just be sure not to overdo it, as too much humidity can lead to mold and other issues.